"He is Risen" is my favorite Easter hymn. And one of my favorite things about spring is new flowers. The first ones to come up are the daffodils that I transplanted from my parents yard. Here in the South they have already bloomed and gone, but they still say spring to me. Right now we have irises and bluebonnets and the redbud tree is blooming too. Happy Easter!
Tuesday, March 19, 2013
Easter Art
"He is Risen" is my favorite Easter hymn. And one of my favorite things about spring is new flowers. The first ones to come up are the daffodils that I transplanted from my parents yard. Here in the South they have already bloomed and gone, but they still say spring to me. Right now we have irises and bluebonnets and the redbud tree is blooming too. Happy Easter!
Thursday, January 10, 2013
Scripture App
I'm not sure if this counts as being frugal, but it has been a BIG help to me in my spirituality (and that's worth a lot), so I'm passing it along.
I have struggled for years making scripture study and journal writing part of my daily routine. At one point I even devoted the first 15 minutes of my elliptical machine use to reading scriptures. That one flopped - I can't imagine why:)
My latest, most successful attempt centers around my computer. I've noticed over the years that my life in large part revolves around my computer. It is a very, very rare day that I don't turn on the computer at least once. And now that I'm helping my husband with his business, I spend even more time with my keyboard. So, the idea was this: I found a scripture app that I liked, (I chose www.ldsscriptures.com, but there are lots of them out there). Then, I put the program in my start-up folder. (A suprisingly simple process - in Windows 7/XP, click your "Start" button, select "All Programs," find and open the "Startup" folder, and drag/drop your program into it! - I've since switched to Windows 8, which I don't understand, so these instructions are subject to the limits of my rather-limited-memory).
This means that, each time I start my computer, LDS Scriptures opens up. I have a personal rule that I can't shut it until I've written a short note in the journal section and read a least a few verses. So far, it's been quite successful.
I have struggled for years making scripture study and journal writing part of my daily routine. At one point I even devoted the first 15 minutes of my elliptical machine use to reading scriptures. That one flopped - I can't imagine why:)
My latest, most successful attempt centers around my computer. I've noticed over the years that my life in large part revolves around my computer. It is a very, very rare day that I don't turn on the computer at least once. And now that I'm helping my husband with his business, I spend even more time with my keyboard. So, the idea was this: I found a scripture app that I liked, (I chose www.ldsscriptures.com, but there are lots of them out there). Then, I put the program in my start-up folder. (A suprisingly simple process - in Windows 7/XP, click your "Start" button, select "All Programs," find and open the "Startup" folder, and drag/drop your program into it! - I've since switched to Windows 8, which I don't understand, so these instructions are subject to the limits of my rather-limited-memory).
This means that, each time I start my computer, LDS Scriptures opens up. I have a personal rule that I can't shut it until I've written a short note in the journal section and read a least a few verses. So far, it's been quite successful.
Friday, November 30, 2012
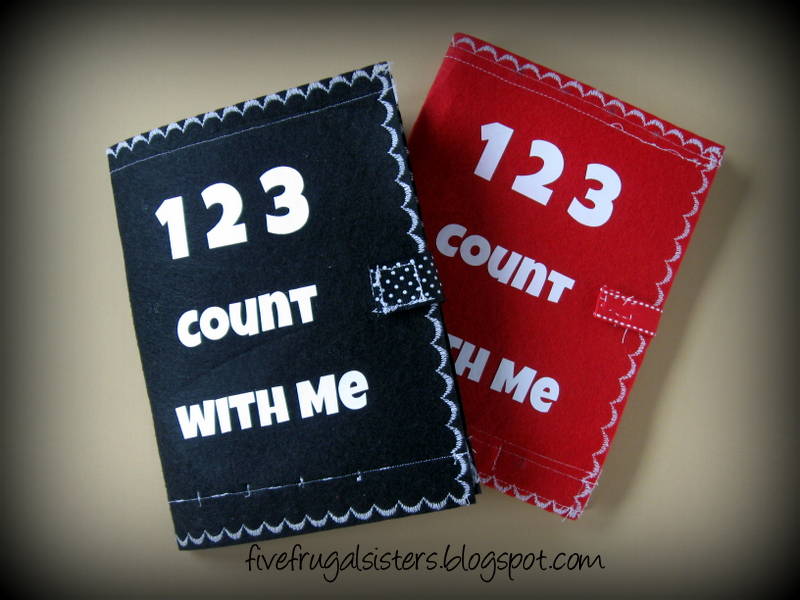
Homemade Gifts - Quiet Pages Counting Book
This idea came off of pinterest somewhere, but has been very customized by me. I think quiet books are awesome, but the thought of creating page after page and putting it into one big book is intimidating (i.e. takes too long). I've opted to do Quiet Pages. Same concept as a quiet book, but in individual page format. Plus if you have multiple kids they can each have a page instead of one person having the book.
Supplies:
stiff felt cut to 8 X 12
small ribbon
wider ribbon
twill tape (or wide ribbon would do)
assortment of beads
number beads
Most of my beads came from my daughter's discarded collection (the garage sale box) so my cost was minimal.
I won't make a detailed tutorial, but I will say that super glue isn't a good idea. I started out gluing the ribbon down to keep it in place while I sewed, but ended up just hand placing each ribbon as I got to it (worked much better and didn't leave super glue residue on my sewing machine).
The title on the front is in heat transfer vinyl. There are some advantages to having your own online business!
Supplies:
stiff felt cut to 8 X 12
small ribbon
wider ribbon
twill tape (or wide ribbon would do)
assortment of beads
number beads
| Counting Page in progress - notice marks 1" apart for ribbons |
| Toddler Tested - Mother Approved |
| Counting Quiet Page |
| Counting Quiet Page |
I won't make a detailed tutorial, but I will say that super glue isn't a good idea. I started out gluing the ribbon down to keep it in place while I sewed, but ended up just hand placing each ribbon as I got to it (worked much better and didn't leave super glue residue on my sewing machine).
The title on the front is in heat transfer vinyl. There are some advantages to having your own online business!
| Love the Red Number Beads |
Monday, November 26, 2012
Homemade Gifts - Funny Faces Quiet Page
Spoiler alert: If I drew your name for Christmas in the sibling exchange stop reading now!
This is my favorite quiet page of all time (at the moment). In the process of making it every kid in the house ended up playing with it. The boy hair became a beard, a mustache, a crown, etc. The yellow center for the flowers became buttons, eyes, earrings, etc.
I contemplated sewing some pieces together like the yellow center onto the flower, but didn't. Rather than telling the kid what the piece was intended for it's fun to see how they interpret or use the pieces.
Warning: not for small kids who put everything in their mouths!
This is my favorite quiet page of all time (at the moment). In the process of making it every kid in the house ended up playing with it. The boy hair became a beard, a mustache, a crown, etc. The yellow center for the flowers became buttons, eyes, earrings, etc.
I contemplated sewing some pieces together like the yellow center onto the flower, but didn't. Rather than telling the kid what the piece was intended for it's fun to see how they interpret or use the pieces.
Warning: not for small kids who put everything in their mouths!
| Funny Face Quiet Page |
| Roll to Store Funny Face Quiet Page |
| Funny Face Quiet Page ready to go in ziplock |
| Funny Face 2 Quiet Page |
Monday, November 19, 2012
Inspirational Screen Saver
I recently fell in love with all those cool printables on the internet. Only problem is - I haven't printed a single one of them. And if I did get around to printing them (professionally or using all my color ink to do so) where would I put them. I'd have to get frames and make holes in the wall...... (excuses, excuses, excuses).
Enter: THE INSPIRATIONAL SCREEN SAVER. I made a folder in my picture files just for my inspirational printable downloads and I set it as my screen saver! LOVE IT!
So here are some links to my favorite "screen saver" printables:
It Works for Bobbi Free Printables

I liked the door so much it is currently my desktop background.
A Lifetime of Wisdom tons of inspirational images no necessarily printable

And Proclamation pictures blogspot

Next project - go through my Quotes Board on Pinterest and add to my screen saver!
HINT - Pinning your pics to a pinterest board will help you find them again if you want to find the source.

I liked the door so much it is currently my desktop background.
A Lifetime of Wisdom tons of inspirational images no necessarily printable
And Proclamation pictures blogspot

Next project - go through my Quotes Board on Pinterest and add to my screen saver!
HINT - Pinning your pics to a pinterest board will help you find them again if you want to find the source.
Thursday, November 15, 2012
Balloon Pinatas
For my daughter's birthday party I thought it would be fun to fill a balloon with candy for each kid. Kind of a mini-pinata. Plus we were doing a princess party and someone online had the idea to do it and say that the candy was under a spell and they had to break the spell (and the balloon) to get their candy. Cheesy, but it fit the theme. After getting candy and trying to stuff it into an deflated balloon, I realized there had to be a better way. Back to the internet! This is what worked for me:
1. Get a tube. The bigger the more candy you can put it, but you have to be able to stretch a balloon across one end. What I found was a vacuum attachment tube.
2. Get candy. Make sure it fits in your tube. You can also get confetti, but since I didn't want confetti all over my house, I didn't.
3. Get balloons. The big kind.
4. Stretch the balloon over one end of the tube. Fill the tube with candy and confetti, and blow up the balloon using the tube. So you have your lips, tube filled with candy, and then the balloon. (I did wash out my vacuum tube before doing this!) When the balloon gets pretty big the neck of the balloon expands enough that you can tilt the tube down and all the candy falls into the balloon. Then you just take the balloon off, let air out till it's the right size, and tie it.
The kids had a great time with it, especially since they were 4 year olds and actually had a bit of a challenge popping their balloons. Great fun and faster than the papier mache pinata I made for the last birthday party! give it a try just for fun!
1. Get a tube. The bigger the more candy you can put it, but you have to be able to stretch a balloon across one end. What I found was a vacuum attachment tube.
2. Get candy. Make sure it fits in your tube. You can also get confetti, but since I didn't want confetti all over my house, I didn't.
3. Get balloons. The big kind.
4. Stretch the balloon over one end of the tube. Fill the tube with candy and confetti, and blow up the balloon using the tube. So you have your lips, tube filled with candy, and then the balloon. (I did wash out my vacuum tube before doing this!) When the balloon gets pretty big the neck of the balloon expands enough that you can tilt the tube down and all the candy falls into the balloon. Then you just take the balloon off, let air out till it's the right size, and tie it.
The kids had a great time with it, especially since they were 4 year olds and actually had a bit of a challenge popping their balloons. Great fun and faster than the papier mache pinata I made for the last birthday party! give it a try just for fun!
Monday, November 12, 2012
The End of Bathroom Towel Wars
| Two Towel Rods = War |
It seemed that the kids bathroom had a chronic condition called towel-apathy. The towels always wound up on the floor looking very pathetic or when they were hung up the bathroom looked like a laundry mat with multiple towels on the same rod and towels over the shower rod too.
| Six Towel Hooks Plus Rod = No Towels on the Floor? |
Subscribe to:
Posts (Atom)